Sunday, November 18, 2012

Handmade Holiday Fun Beggins


My Seeds and Sawdust Necklace was featured in LandMstudio's Etsy treasury!  And I've gotten a good number of favorites lately as well.  Nice to know people like what I make - probably means I should be making more of an effort to sell stuff!  


Instead I am helping out my friend Emma with an order of scarves.  She is selling them on consignment in a friend's shop in Vermont.


It's relaxing to be knitting and knowing I'm going to be payed for it without having to put in all the work around selling it!

Now I need to start thinking about what I am going to make for Christmas presents this year...


Wednesday, July 25, 2012

Penant Baby Quilt

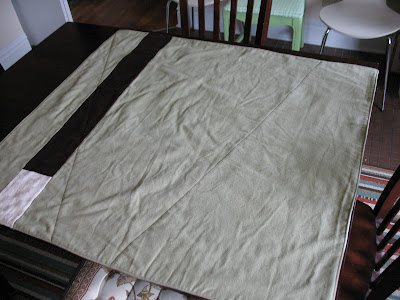
A friend posted pictures of a quilt she made for her baby girl and I fell in love with it.  Had to make my own version.  


I used only fabric I already had in my stash. The pennants are material from childhood costumes. The ribbon is made from the waistband of one of my grandmother's skirts. The background of the front is material from my mother's former futon factory. The back is scrap flanel and scraps from the recipient's brother's quilt I made several years ago.


 Front


Back


These pics are pre-ironing.  Promise I did not give it to it's recipient this wrinkled, or with dangling thread!  I had a lot of fun making it.  Tip - sew all the way around the pennants (including across the top) before sewing the ribbon over them to secure the edges.


The original idea came from http://helpinglittlehands.blogspot.com/2012/01/bird-and-bunting-quilt-with-pattern.html

Friday, June 29, 2012

Pretty Papier-mâché Night Stand

I believe my mother first sent me a link to this project (we are always sending each other pretty things and fun ideas - I love my mum!) I absolutely loved it, so when I moved to Chicago and found myself in need of a night stand, I decided it was time to give it a try!


I had lots of cardboard boxes to use after unpacking, and collected news paper from friends and family. Hooray for re-use!


Cut out the basic shape (mine is a little more basic than the original.)


Added a shelf...


 with reinforcements.


 Added overhang and reinforcement to the top.


 Then a couple of layers of papier-mâché!


 Next up - paint!


 I used what paint I had, and used much simpler methods. Basically, puts some paint on it.  First coat was a dusty peachy color.  The newspaper showed through a bit, but I decided that would just add to the patina look.


 Then with a brush on the dry side, I brushed a light coat of pale blue over the peach.


It turned out pretty nicely, though you can't see much of the peach showing through in these pictures.


And it looks neat in my tiny room!

I am still considering rubbing some gold paint over it.  We'll see.


Sunday, December 25, 2011

Christmas Fun 2011

Every year I end up making a batch of ornaments.  I have not done this deliberately, but I seem to always come up with some idea that I just have to try out, and then end up making them for the whole family.  This year it was fabric star ornaments.


My goal this year was to make (or buy hand made) as many presents, including the wrapping, as possible.  These stars were made from fabric that I acquired in LA in October. My friend and I went to an art night down town, and a woman was doing live draping with scrap fabric, scissors, and a stapler at one of the galleries.   She made a... um... lovely... cape for me.  


I decided to repurpose the fabric.


They were really easy.  I drew a star pattern, in the classic kid's star way,


Traced them onto the fabric


Cut them out


And sewed two together, with a ribbon in one point.


The family seemed to like them, though it could have been the general jolliness of the evening.  It really was one of the most satisfying Christmas eves I have had in a long time.  A beautiful tree that my dad and I cut from his friend's property (it was so big we cut of the bottom fourth and put it out by the bird feeder for the birds to shelter in) 


Great food, including the best pork I have ever had (I deviated from my vegetarianism because it was locally grown and an heirloom breed -red wattle hogs) and a pear and pomegranate salad thought up by my mom and put together by me.


I hope that you too, had a lovely Christmas filled with family, food, and warmth! Merry Christmas to all!

Thank you to my cousin Kellie for the Christmas tree photo and the photo of my stars in the basket.

Wednesday, November 23, 2011

Protecting the Stash- of yarn, that is.

Over the summer I lived in an apartment in rural Wisconsin which was not exactly nature proof.  Bugs and mice frequently found their way inside.  I grew up in an old farm house in the area, so I am used to nature intruding.  Some of the visitors were pretty neat, like the two luna moths that showed up on my porch:


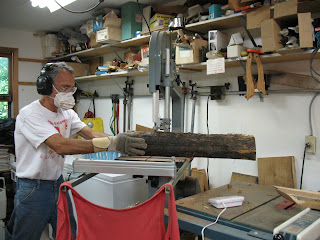
I was not so excited about the very dead mouse I found late one night in the infrequently used bathroom downstairs as I was trying to clean up for some friends who were coming in late.  I was also not happy about the idea of less-attractive types of moths getting into my wool yarn.  So I asked my dad to help me make some cedar blocks to dissuade them.


My father, a life-long woodworker and one of the most meticulous carpenters I have ever come across, has his own version of my stash of yarn stored in the rafters of the garage.  Over years of managing our family's woods, he has collected some beautiful boards and burls from trees he has thinned out or had to take down.  He had some cedar logs from the trees in front of the farm house I grew up in.


When we cut them open, we discovered this beautiful purple color.  Unfortunately, it will probably fade over time, but it sure is pretty now!


Dad used the band saw and planer saw to turn the logs into thick planks.


Smells like cedar.


The finished blocks are the perfect size to slip into the plastic containers I keep my yarn in.  Cedar can stain, however, so I sewed cloth sleeves for them out of an old Tshirt.


I haven't worked with my dad in his shop in a long time, and it was great to be in there again.  And now my stash is protected!

Sunday, January 30, 2011

Beer Gloves

These gloves (Beer Gloves by Kurt Fausset) are my new favorite knitting project.
Finished.


The pattern is written for two circular needles, but I prefer double pointed. 

I thought they looked kind of fun with the double pointed needles still in them.

I love the yarn (Lion Brand's Amazing) - really great color and texture for an inexpensive yarn.


The "Whale Spine" cable pattern cured my fear of cables.  It was very simple and easy to repeat from memory, yet resulted in such a satisfying cable!


The pattern also included a textured patch on the palm for opening twist off beer bottle caps, from wich the name of the pattern originates I assume.


I really love the gloves, but they are definitely sized for a man's hands.


Too big!

So I am going to alter the pattern to fit my hands.  I think I will also change the cable to a leafy vine pattern.  I found a pattern that I like, but have to translate it for knitting in the round with double pointed needles.  I may also try to alter the texture on the palm to provide some padding for biking.

Challenges, challenges!  I love it.  I learn so much working this stuff out on my own.

Monday, January 24, 2011

Leaf Hat: my first attempt at designing a knitting pattern!

I promised my cousin a hat for Christmas, and have not yet delivered on that promise.  But have no fear Zoë, I am working out the kinks in my design and you will have your hat!


This hat was inspired by a sweater worn often by my friend Mia.  The sweater has scalloped leaves along the bottom edge that I sort of fell in love with.  There was a hat pattern that I particularly liked, but wanted to make my own, so I decided to replace the ruffle on the side with hanging leaves.  I found a pattern for the scalloped leaf edge and used some graph paper and experimenting to flip the leaves around and put two side by side.  (I probably could have found a pattern for this with some more looking, but what fun would that be?)


I added stitches to the crown of the hat to make it a little more roomy, and this is the result!  
I think it turned out pretty well, even in the cheap yarn I used for this first attempt!  I am working on the next attempt in a textured yarn and will post pictures of the finished hat.